Tuesday, June 28, 2011

How to Design a Pattern Repeat

When I first started designing images that I uploaded to Spoonflower for digital printing, I was centering the images for use on an 18" x 18" pillow.  The images had "White Space" all around them, because they were centered on the pillow, like a framed painting.  That left plenty of room for the seams, trims, and the zipper at the bottom of the pillow.  Then I started fiddling around with putting my images into repeats, with the idea that they could be used for wallpaper or gift wrap.

Spoonflower's in-house software can put your images into various repeats, like this Half Brick repeat shown on a Paul Stuart tie:


This is their Blue Printed Surfer tie.  See how the surfer shifts over on every other row?   That is a simple Half Brick repeat, and is pretty for small objects...or in small doses.  You wouldn't want several yards of 54" wide fabric printed like this, or the image would turn into a ditsy sea of dots.

To get an image to Flow across a large expanse, with no obvious start or finish, you have to use a few tricks.  


There is no defined center when you look at this Waverly fabric called Hidden Reef- it just flows seamlessly from side to side, and also from top to bottom.   Although it looks very complicated to create, it is actually quite simple.

After months of experimentation with Photoshop and their Offset Filter, I came across this straightforward tutorial in how to create a seamless repeat that flows effortlessly.  Julia Rothman shows us how she created this pattern:


Here is the text of Julia's tutorial:


"One of the questions I frequently get emailed is -how do you make a repeat pattern? I thought it would be fun today to do a little tutorial showing you how simple it is even with a very complex drawing. And you don’t even need a computer! (I usually do my repeats on the computer but today I’m doing it the way I was first taught.) Here’s the old fashioned way of making a tile-able design:


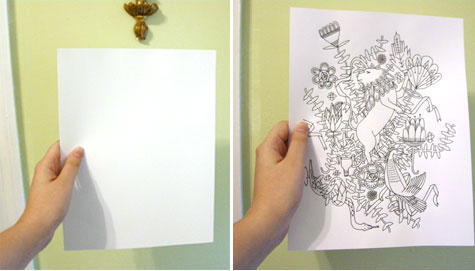
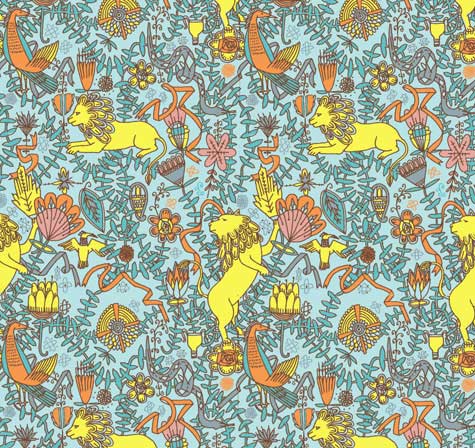
On a clean piece of paper draw a design in the middle of your paper without letting any of the drawing touch the edges- this is very important. (I am going to draw lions and vine-y things- an influence from last months visit to the American Folk Art museum in nyc.)


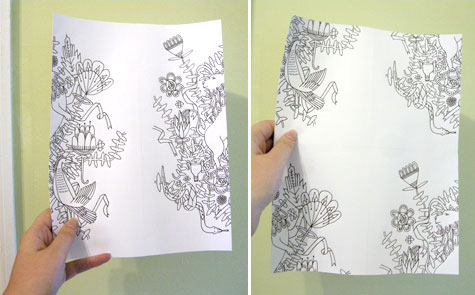
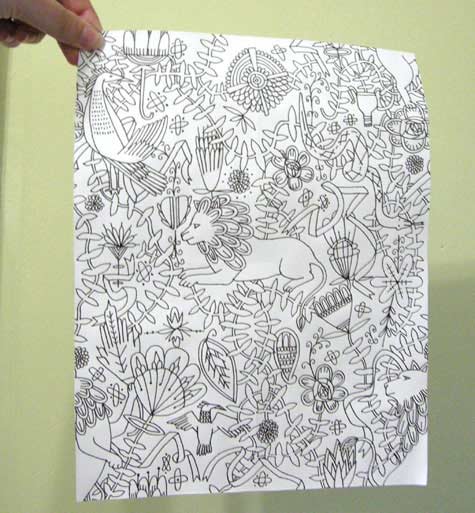
Once you finish the middle space as much as you want you are going to cut your drawing in half- scary I know- but that’s why computers are helpful. Once you have the two pieces flip them and tape your drawing back together. Put the tape on the back of the paper so it doesn’t obstruct your drawing at all later. Also try to tape your drawing back together as perfectly lined up as possible. It’s hard to see that I’ve even taped mine since I’ve lined it up so well. Next you are going to cut your drawing in half again the other way- (yikes!) and flip those pieces and tape them back together. Now your design should be on all the edges only and you have a big middle white space. Now fill this space with the rest of your design. Remember again- do not draw to any of the edges of the paper.

Once you finish filling in all the parts you want to fill in you now have your repeatable tile. You could color this tile and then xerox it many times and line up your design- plaster it on your walls and make wallpaper. I am going to cheat and do the final coloring steps in the computer to finish up my design. I am going to scan my drawing, take it into Adobe Illustrator, color and repeat it there."


I used Julia's tutorial to go to Photoshop and use the Offset Filter to whack my design into quarters, like she did, and then just filled in the center with the whole (original) design.  You could always put something different in there...the sky is the limit!

Now to figure out a half-drop, tileable repeat...any suggestions out there??

Monday, June 27, 2011

Beach Cottage Renovation Finished!

After my two month hiatus to tend to the Beach Cottage renovation, I have GOT to get back to Textile and Graphic Design.  So that I don't feel like I left everyone in the middle of the road, here are some shots of our finished renovation - that I am just so in love with.  Pictures aren't hung yet, because I can't bear to put holes in the walls yet!  Maybe tomorrow.

The "sewing/create something" room is now totally white.  I took the old kitchen peninsula and made a cutting/pattern table out of it.  And, look at my new window by the sewing machine!
This is what it looked like before:


Big Change, there!

Kitchen all finished!
My yummy new tub, that USED to be my closet!
The mirrors tilt!
Wooden blinds coming tomorrow - do you remember how this looked a month ago?  Yikes!
This was the bathroom on May 24.  What a difference, huh?

     So much work, soooo much work.  But I am happy, happy, happy.  And now it is time to get back to Surface Design...graphics, textiles, Illustrator and Photoshop.  In my clean new house!


Thursday, June 23, 2011

Beach Cottage Mahi Bowl Meal

The Beach Cottage renovation is virtually finished, and now all I have to do is find everything I packed away and try to integrate the old with the new.  Not to mention figuring out how to get used to operating the new equipment. 

We've never had gas cooking out here on the island, so after 28 years of preparing meals on an electric stove, here we go!  As promised, here is a recipe and photos of the yummy Mahi-Mahi that was presented to me by the Captain, and cooked up on my new gas range:


We actually call Mahi-Mahi by the East Coast name of Dolphin...in the Keys, they call it Dorado sometimes.  This is what the fish looks like, so that you don't confuse it with the Dolphin mammal, aka "Flipper"!


This is my oldest son with a big Bull Dolphin, aka Mahi, caught on an Ocean Isle Fishing Center boat.
Mahi recipes are all over the map, as it is a very sweet tasting fish which people love, and it also freezes beautifully.  We always freeze the filets or chunks in quart Zip-Loc bags, with the fish surrounded by water.  When I thawed out the fish for our Mahi Fish Bowl, I simply put the bag in fairly warm water until the fish/ice block could be removed from the bag.  Then I let the block sit in lukewarm water until the pieces could be pried apart without breaking.  Once they were pliable, I cut them into strips or chunks about 2 x 3 inches each.  


Mahi takes awhile to cook through, so it is easier to get a consistent texture if you cut it up into small pieces.  Like this:
This photo, used on several sites, shows the dark red bloodline - I ALWAYS remove the bloodline.

When we want to just chill out in front of the TV and watch Deadliest Catch, we've found that the best way to eat is simply out of a Bowl.  That is, everything piled into one bowl, so you can curl up in your favorite spot and not be spilling something off a flat plate when the Time Bandit takes a rogue wave.  


Keep it simple - a couple of main ingredients, with condiments or accents piled on the side, and all presented on top of steamed rice is about all you'll need, other than soy sauce and, for me - always - Rooster Sauce!  I can't eat without it.
This stuff is HOT.  It's made by a company named Huy Fong, out of California.  How it started is quite a story, and you can read about it Here.  The image came from their website, Huy Fong Foods.


But, back to the recipe.  Here are the ingredients for the Asian Flour:
     Self-Rising Flour - about a cup or so.  Sometimes I cut it with some cornstarch
     Sea Salt - you can sprinkle this on the fish, but I  just put it in the flour-not too much!
     Garlic Powder - to your taste, but not too much or it will overpower the Mahi
     Ginger Powder - about a teaspoon
     Black or Regular Roasted Sesame seeds - about a quarter cup
     Assi Brand Coarse Pepper Powder - a heaping tablespoon, at the minimum
You can get this at any Asian market - I use it in a lot of my cooking...including Pinto Beans!
For the oil, I use 2/3 Peanut Oil, 1/3 Olive Oil.  Just get it hot, dredge your Mahi in the flour, and slip it in.  Turn once after the first side has turned golden.  You know it's done when a fork inserted in the fish will turn easily...don't overcook, but be sure it is done through.  Some fish is good on the medium rare side, but not Mahi.

Here is my new range, going full blast on our Mahi Bowl Meal:


Meanwhile, just oven-blast some fresh broccoli:


Thaw out some frozen Tobiko (the roe of Flying Fish-available at Asian Markets) if you like, 
and re-hydrate some Seaweed or buy Seaweed Salad at your local Asian Market.  Scoop out some fresh steamed rice, put it in the bowl and top with your Mahi and other condiments.  


Turn on Deadliest Catch, pour the wine, grab your chopsticks and go!

Tuesday, June 21, 2011

Fabulous Food in an El Paso Barn

Okay, I know my Blog is geographically located in North Carolina and Georgia.  But, let's take a pleasant side trip to the Home/Barn of Richard & Helen Knopp in El Paso, Texas.  Helen is my Husband's sister, and she has the impish look of their Father, Harold.

Same twinkly eyes, same engaging grin.  Not to mention the freckles.
From a very early age, Helen has been stone-cold in love with Horses.

Meet Ladie Zortanna, her current horse-love and Dressage Partner.
And, she has a son, Troy Williams, who is stone-cold in love with the preparation and presentation of fabulous foods and wines.  Never mind that he is a Corporate Suit during the day - after he clocks out, he dons his REAL uniform and rocks the kitchen.  Take a look:

Here is Troy with Rosie, his  Sous-Chef for the Barn Dinner, in the trenches with their tools and raw materials near at hand.
 Helen & Richard love to entertain close friends and family, and knew they could call on Troy to stage an all-out dinner in the Barn amongst the horses, with numerous courses and lots of wine.  After some Serious Barn Cleaning, the stage was set and ready for the props:

The setting of the Dining Table in front of the stalls is watched with great anticipation...the horses are certain that all this fuss and attention to detail is being done just for them.
 As the sun drifted towards the horizon, the participants gathered in the sweet evening air, and the event began.

The table was adorned with a Southwestern floral arrangement, and place cards that were die-cut specifically for the dinner.  See the little horses on top? 

The lovely meal begins with a soup composition.
 
The evening progressed with the participation of the horses, who were simply delighted that their humans had organized this event for them:


Swapping kisses for the Gruet.
They looked on as lovely, lovely compositions were served by Chef Troy:


There was no photo for the Seventh Course, which was a Spanish Surf 'n Turf.  Sounds yummy, of course.  So I inserted a photo of our intrepid and very talented chef, who is serving after all that work with the utter delight on his face that comes from following his passion.  Forget the hard work, this is what he loves to do.  And it shows.

All good things must come to an end, but what satisfaction is on these faces!
 Kudos to Troy, and to Richard and Helen for sharing your photos with us for this blog.  I am always delighted to see an artist at work - the energy and passion and sheer happiness in the final result is just, well, Stone-Cold fabulous!

Saturday, June 18, 2011

Poagie Bobbing at The Jolly Mon Tournament

This weekend is the annual Jolly Mon King Mackerel Fishing Tournament, put on by the Ocean Isle Fishing Center.  Since older son Brant took over this tournament from Jamie Milliken years ago, it has always had a family flair.  We've all taken our turns working under the tents - the younger women registering the hopeful fishermen at the Captain's Meeting , Grandma Mac (Vera) selling T-Shirts, friends and family feeding the crowd, and ALWAYS urging Families to Fish Together. 

A view of the crowd from the upper deck.
One of the most treasured contests at the Captain's Meeting is the annual Poagie Bobbing Contest for the kids.  For those of you that don't know, a Poagie is a baitfish - Menhaden is another name for it.  They produce a smelly fish oil that is actually used in a lot of products...but that is a post for another time.  They are small fish, they're pretty smelly on the inside, and they have the usual slime and fins associated with any fish.  And the kids have to catch them IN THEIR MOUTH.  The kid's mouth.

Here are some of the entrants, lined up in front of the stage prior to the start.  Notice the tense, competitive postures of the little ones on the grass??  They are dead serious about this.
There are different age groups, so that the 4 year-olds (yes, 4) aren't left in the dust by their fellow 17 year-old competitors.  The rule is, you cannot use your hands, only your mouth.  Like this:

This young man has elegant style, and kept his hands gracefully away from the edges of the tank.
There are ALWAYS prim little girls who join the fray:

This little girl tucked her dress under her knees to make sure it didn't fly up and embarrass her.  And then, SHE WENT FOR IT!  She was so determined, and stayed under so long that we thought she might drown.  She did catch that Poagie she was chasing in the corner of the tank.
And then there are the 3 year-olds, who have figured out that you can go up on stage, have hundreds of people focused intently on you, and still get roars of delight from everyone by simply reaching down in the tank and plucking a Poagie out with your hand...

Check out my Granddaughter's face on the right - she's realizing the coup this little girl just made - cheers and bravos from the crowd - without having to stick her head down under the water with all that fish-slime!  Rats!
There were winners in all three age divisions, and while all the kids went home with a medal worn proudly around their necks, the winners went home $50.00 richer.  I'm sure there were Poagie dreams on the pillows last night, and plans of how they would tackle it next year...

And another Jolly Mon Captain's Meeting, complete with Poagie Bobbing, is over.
 If you are in the Ocean Isle Beach area, final fishing day is tomorrow, with weigh-in starting at 2:00 and continuing until 5:00.  The awards ceremony begins at 8:00, with thousands of dollars in prizes being disbursed to the lucky winners.  Come on by and join in the fun!

Monday, June 13, 2011

Beach Cottage Decor - Shopping List

It's time to resume "Normal Life" and the Beach Cottage Renovation.  When I walk back in there tomorrow night, the floors should be refinished and gorgeous, and we'll be ready to place the furniture back where it belongs and start unpacking boxes.  Meantime, I've been thinking about how to accessorize our new updated look, and find myself falling for looks like this:

I love the idea of using these glasses for wine - I found them at Berry Red.

 Also love the look of this sideboard - and you just KNOW that I will be making the Giant Clamshell myself...


The Guest Bathrooms will need new shower curtains, and they'll also need new hooks - these are perfect for the look I'm going for:

I also found these at Berry Red - my newest online fave store to browse.  Don't you love the retro look of these?

I can hardly wait to haul my big belt sander up from the basement and sand the top of my dining room table down to the wood.

Okay, so you can't really see the table, but it is painted white.
And, because we cook so much with fresh produce from local farmers, I need one of these:


I'm so happy with the palette I've chosen, and can hardly wait to start integrating my old accessories in with the new - not to mention firing up my new gas stove and grill!

The King Mackerel, Sea Bass, Mahi-Mahi, and Spanish Mackerel are biting off the coast right now, and I WILL be sending Husband off to fish...recipes to follow!

Sunday, June 12, 2011

A Stylish Journey Comes to a Close

Vera with her catch on the Carolina Fishing Pier.
We arose before dawn to start the journey to Mississippi, where Vera wished to be buried in the cemetery beside her husband, Harold.  As we drove out the driveway into the rising sun, Husband and I both said at the same instant, "This is like Lonesome Dove!  Remember how Woodrow promised Gus that he would take him home for burial, and what a trip it was??"  And then we laughed, because the reason Woodrow went through all that he did to get Gus home to be buried was the very reason that we were having a funeral spread out over the entire Southeastern Portion of the United States for Vera.  Woodrow loved Gus, and we love Vera.

She was respected and beloved by so many people who wanted to say goodbye to her in the proper setting...if it could have been arranged, I think this funeral procession would have also had side trips to Florida, Inland North Carolina, Washington DC, and Japan.  But all goodbyes have to end sometime, and this one ended in Forest, Mississippi, amongst loving family members who have the powerful veil of the McMullan lineage glowing around them, and the spice, vinegar, and Southern love that movies are made of.

Thankfully, when I walked in and saw her at this Funeral Home, I saw that she had fully departed.  She is flying in the stars for real now.


Today it ends.  Tonight she is, as Husband said, "Twangling her toes with my Father again".  She was sent lovingly on her journey with tributes by family members who told stories, prayed beautiful prayers, read from scriptures, and saluted her with the most beautiful floral arrangements I have ever seen. 

Godspeed, Vera.  You were something else.

Friday, June 10, 2011

Family Connections - Taking Note

Vera and Rube, early on.

All day today, emails and messages have been pouring in from all the folks who loved Vera and will miss her presence on earth.  We drove from Ocean Isle to Atlanta - the first leg in the trip to Mississippi to take Vera to be buried by her husband, Harold.  Coming down I-20, there weren't many words spoken...I was thinking about Vera and what she had meant to me, and my husband was firing random shots at the world.  All you women out there know what I mean.

Patiently, I admired, agreed, and fluffed up his arguments.  But the whole time, I was thinking about the amazing outpouring of love and support for Vera in her last weeks of life.  All of us should be so lucky.  And I guess Lucky is not the operative word here, for Vera worked very, very hard on her family connections.  She knew that those connections and commitment were the backbone of life.  What makes it all worthwhile, and what rewards you in the end with the loving care that you need when you are helpless.  She wasn't in a Nursing Home, she was At Home, and her family gathered around her to feed her, bathe her, and smooth her down with the particular sensitivity that comes from knowing her intimately, and loving her unconditionally. 

Somehow, a lot of us forget or discard those connections.  When we gather for the occasional funeral or reunion, we are uplifted and renewed by connecting with other family members, and then we retreat back to our nests, fluffing and nudging every twig and feather back to the position that brings us comfort.  Only problem is, we forget that we won't be able to do that forever.  And when we are unable to lift even a twig, or fluff the nest, that's when family comes to the rescue.

Rube's Paternal Grandparents.  Who were crazy in love.

And hugs us just exactly like we want to be hugged.

A Stylish Journey

Vera Idella McMullan Nov. 6, 1920 - June 8, 2011
On the morning of June 8, God thankfully allowed Vera to clock out and head on home to heaven.  One second she was breathing, the next second...she wasn't.  So quiet, so gentle.  I was there soon afterward, as I only live about two miles away.  She was still warm, and still seemed alive, but she was thankfully finished up with earth and already departing.  The family gathered one by one - coming from jobs, schools, meetings, and the other whatnot of life.  

As they arrived, they went immediately to her side and kissed her forehead and smoothed her hair.  She had to have known that even in death, she still had that particular stylish look - that Vera Style - in her black nightie, edged in lace.  

When the Funeral Home arrived to take her away, they had to wait and wait as everyone wanted to touch her and talk to her one more time.  So they finally said, "Just call us when you are ready to let her go", and they left.  The Hospice Nurses finally were allowed to go in and wash her and straighten everything, and still the visits went on.  Finally, almost three hours after she had died, her children let her go.

Immediately, her daughter and granddaughter Tiffany went to her expansive closet and began choosing her outfit.  Less than a minute later, Tiffany swept a purple A-Line Dress with a Cropped Jacket off the rack, and pronounced, "This is the one; this is it!".  It had a Ruched Collar in the same fabric as the dress  - so stylish, so Vera.  It was easy for Deborah, her daughter, to select from the dozens of shoes...cocktail heels that were clear plastic, spangled with tiny rinestones.  Jewelry was selected next, and they were off to the Funeral Home.

Well.  If you could just have seen her last night at the viewing.  She looked fabulous, simply fabulous.  The folks there at Brunswick Funeral Services had styled her hair and makeup from a photo I had emailed to them, and they were spot on.  Her skin was peachy and glowing, the bruises all gone.  Her hair was perfect, styled exactly like she would have done it.  As people passed by the casket, their constant comment was, "What a beautiful woman!".  At 90 years of age, after such a struggle to die, still stylin'.

Vera and her husband Harold.

Monday, June 6, 2011

Vera On Her Trip to Heaven

My Mother-In-Law is over 90 years old, a World War II veteran, and is battling through the death sequence of her life.  Last week, we thought she had about 24-36 hours to live.  That was on Thursday.  Today is Monday, and she is still here.

Hospice gave us a booklet and we all read it last Thursday...says that hallucinations (check), thrashing around with the arms (check), talking non-stop to people who aren't in the room and possibly deceased (check), eyes 3/4 closed and not focusing (check), no intake of food, little intake of fluids, and long long periods of sleep (check) are harbingers of imminent death. So I called my Husband and son to come back from Atlanta on Thursday, and they came skidding in around 9:30 PM.  And she is still, unbelievably, painfully, communicating with us.

Her arms and legs are bones wrapped in thin skin, so fragile that she can't be touched there without a little scream from her chest.  Her lips are so chapped from the lack of fluids that the skin is peeling off, no matter how much oil and salve we lovingly swipe on them.  Tonight, her mail delivery lady (US Postal Service Employee) arrived at the doorstep with her guitar and amplifier and begged to sing to her.  So we fed the postal worker a glass of wine, gathered the family, and moved to Vera's bedroom.  And the postal worker tuned her guitar and began singing.  Like an angel she sang.  Like an angel.  All in the room were sobbing at the end at the pure sweetness - all the way down to the 10 year old great-grandson.  We weren't sad, we were just so overwhelmed by the tsunami of love, and the reception of love by Grandma Mac.  She was obviously listening, and settled down like a feather within seconds after the sweet music began.

I keep thinking, what have I missed here??  Why is God keeping her here with us so long, when she needs to just go fly in the stars?  Only thing I can think of is that it is just Vera.  She always ran her own road, and ignored the obvious solutions.  She is doing it her own way, and maybe hoping for another day of fishing, shopping, cooking, and loving her family.  Just Vera Idella.  Just her.

Sunday, June 5, 2011

Cabinet Hinges in a Nutshell...

As promised, here's a quick jot on Cabinet Hinges - not very entertaining, but if you are renovating your kitchen, you are going to run into this.  Took me DAYS to work all this out.

If you are trying to keep your existing cabinets (as I was) you need to know the different styles of cabinet before you go off shopping for hinges.  Here are the two different styles:

You can see that the cabinet on the bottom takes a hard right and hard left when it comes to the front.  The door has to be mounted onto this frame,  determines what choices you have on your hinges.

My cabinets are "Face Frame Cabinets":

My doors sit on top of the Face Frame - they don't go out to the edge, and they aren't centered inside the opening.  They OVERLAY the frame.


So now I knew what kind of hinge configuration I needed...an overlay hingeOnly an overlay hinge will work in this configuration - not a full or partial inset hinge.  That narrowed the choices considerably.   I wanted little or no hinge visible, and the cabinet maker and job foreman firmly suggested that I go with a European hinge rather than a partial overlay hinge.  The reason?  The good ones are adjustable 3 different ways.  That means you can always go back and loosen the set screws and adjust them if your house settles and the cabinet doors start looking like they aren't on straight!  

So, I used a 5/8" European overlay hinge in brushed nickel.  And, many of the decisions were made for me before I even went shopping...  You can buy these in "Contractor Packs" of 10 at The Home Depot.  Comes out better on the budget that way.

The hinge will be invisible from the outside, allowing my hardware to be the stars of the show!
The reason I had to go with the 5/8" was because my oak frames are what carpenters call "one-by".  That means the frame is 1" by 2".  Only it isn't totally 1" thick - for some reason in this industry, if it says it is 1" thick, it is only 5/8".  That is a mystery I am not willing to spend time on to figure out.

Now, my fairly simple hardware will be the only metal showing on my doors:


Cup pulls for the drawers.
 Okay, I know how boring that was, but trust me, this is info you can use if you are updating your kitchen any time soon.  You won't spend days and days picking out your hinges, and have to return them all because they won't work!

LinkWithin

Related Posts Plugin for WordPress, Blogger...