Showing posts with label Photoshop. Show all posts

Wednesday, September 7, 2011

My Memories Suite - A Software Giveaway!

A couple of weeks ago, right in the middle of Hurricane Irene, I got an email from Liz Gardner at My Memories - a Digital Scrapbooking website.  She'd seen my Blog, and wanted to send me a complimentary copy of their software to review.

Always a knock-over for Free Software...

When you think about it, all Bloggers make Digital Scrap Books.  We select information bits and photos that are of interest to us, write about it, edit everything a couple of times, and publish a Blog Post.

Memory Makers does something similar for folks who don't have a Blog, or who don't have or want to use Photoshop or Photoshop Elements to lay out their Scrapbooks.  Memory Makers' Digital Scrapbook templates already have it laid out...all you do is pop in the photos and text.  It's easy, and not expensive.

So, I figured I had nothing to lose - and I love new toys!  After downloading my complimentary software, I started rummaging through it to see if I should just toss it - or not.  Well.  This is a pretty amazing package for the price they are charging at full retail - about $40.00.  It's easy to install, and here's how it works:

When you open My Memories from your desktop, you're given the option to create a custom book, or you can use one of their free templates - I chose one of their templates to begin with:

This My Memories template is called "A Day in The Life", and has its own graphic design color style, and page layout.  As I quickly learned, you don't have to keep that complete template...you can customize all their templates.

Once I had selected this template, it presented me with a "suggested" Book - with multiple pages, each one already laid out and waiting for me to just upload photos and write my text.  This is what it looked like straight out of the box:

This is the first page...obviously screaming for your own personal touch.

These are my pages after just a few minutes of messing around:

You can see that I deleted some of the pre-packaged elements, and added new ones.

I couldn't resist customizing one of their standard frames with my Coral repeat...I'll show you how to do this in the next post.  I also completely removed their Polka Dot background and put in solid color - two quick clicks!
This is a screen shot of the next page...you can see all the options on the right-hand side of the page.


There were several more pages available in their "package", but once I had played around with these pages, I was comfortable moving on to putting the program through the hoops.  What I discovered was a pretty powerful little tool.

Even if you aren't a Scrap Booker, any Artist or Designer has tons of digital files - photos, custom designs, and things we've snipped off the internet that could use Digital Organizing. This software can lay all that out Really Fast - into one cohesive Journal - without having to build Text Boxes, Layers, and Backgrounds.  It's all already there.  Just click.

It's easy to add Video, Music, or Audio - it's all already programmed into the software  - just click the button, and off you go!

If you like, you can also upload your project to Memory Makers, have it printed and bound starting at $10.00, plus shipping.  A custom library to flip through!  Liz tells me that it takes about 5 business days to print up, and then a couple of days or so for shipping.  I'm envisioning my own shelf of books...

For previewing their software, My Memories gave me one free copy of their software to give away -  

Here's how to enter to win the free copy of Memory Makers Suite V2:

~ Leave me a comment - be sure that your email address is on whichever account you use to comment with so that I can contact you.  Be sure to visit the  My Memories Website and let me know what you think about their software.  I'll pick a winner out of the comments and announce the winner on Monday!

~ Also, My Memories gave me a coupon code for any of my readers to get $10.00 off the purchase of the My Memories Software, PLUS $10.00 off anything purchased at the My Memories Store - $20.00 total, back in your pocket!

Copy and paste this code at checkout to get the discount:  STMMMS97941.


That's it!  Next post, I'll show you how to use your own artwork to create frames and gadgets to add to your My Memories Digital Scrapbook/Journal.

Monday, August 1, 2011

Adobe Illustrator CS5 Live Trace

Now that the Snapping Turtle Saga is (hopefully) over, I can get back to work on Adobe Illustrator CS5.  The tutor, Jay Montgomery from WyzAnt came on Friday, and we covered the Live Trace function.  He was great!

Basically, Live Trace "traces" a raster image - a raster image is a photograph, (the Flower Photos from Colorado!) or a graphic created in Photoshop - in preparation for turning it into a vector image.  The resulting line of the trace is called a Path, with hundreds of little anchor points along the way.  In order to turn the raster image (groups of thousands of little colored squares) into one or more flat planes of color which have  numerical values which can be blown up to the size of a building,  Illustrator "Traces" the image and starts you down the Path to simplify the image and turn it into planes of solid color.

I won't run through the steps to get here - there are literally Hundreds of tutorials on the web about how to use Live Trace -  but essentially, this is the command center in Illustrator that begins the process:


Why do this?  Because if you were to take a photo (a Raster Image) and try to enlarge it to a Building Sized Image, it would get all Pixelated - blurred and confused with millions of little squares trying to be much bigger than they can be.

And this isn't even Near Building size - see what I mean?
 
You can simplify the image in Photoshop before you "Place" it into the Illustrator CS5 program by cleaning up the Noise, separating parts of the image so that you have individual components that make up the whole, and making sure to save it as a PSD image. 

Now, here is the most beneficial thing to come out of the Friday session - there is a tool in Illustrator CS5 that is so exciting, I can hardly wait to get proficient on it.  You see, when I upload a design file to either Spoonflower Fabric Printing or Adaptive Textiles Fabric Printing, to get the best color match I need to use LAB color. 

The color blankets are from Adaptive Textiles, the fabric swatch of Fishing Coral is from Spoonflower.


Since I normally work in sRGB mode (because that is the color mode the monitor is), I've had to calibrate the monitor to the printer as best I can and then print it out in CMYK color.  Because that's the color mode the printer is.  Then spend hours and hours trying to match the color on the hard copy to the color blankets that Adaptive Textiles sent to me.  Sometimes Days.

Well.  Illustrator CS5 has a little color wheel icon parked right in the upper toolbar that is Powerful, Powerful, Powerful!  When you select your artwork, you can click on the icon:
And it opens this function:


Now, here's the good part. I can change the color mode while I am in the Recolor Artwork Screen to LAB color mode.
There is a tiny little icon that lets you change the color mode to LAB.
And then, all I have to do is plug in the numbers from the Adaptive Textiles color blanket for the color I want, and BOOM!  I'm done.

How cool is that?  I mean, how COOL is that?  I'm off to practice now!

Friday, July 29, 2011

Rocky Mountain Flowers and Adobe Illustrator CS5

Here we are, back down close to sea level.  I miss the mountains and their clear air and astonishing vistas.

 Summer River running through Breckenridge.


 And I miss the Rocky Mountain Flowers that were bursting with brilliance and juicy with moisture.  Since I didn't take my Nikon (spur-of-the-moment-trip, you know) I had to settle once more with taking photos with my Iphone.  Which didn't do too bad.  Take a look:


Just look at the Juice in those Pansies!  Yumm.
Here's a group of very buttoned-down Daisies, with their white gloves on, hats tilted just right, and looking like they just stepped out of a Band Box:

All is right in their Daisy World.
Everywhere you looked, there were flowers.  Everywhere.  I took dozens of photos - how could you not??  What a library to work from for future designs...the colors are already worked out, and the shapes are divine.

The Hanging Baskets were great, because the flowers were looking down at you as you passed underneath.


If you take these shapes and colors, and reduce them to lines...Paths in Illustrator...then the sky is the limit for what you can do with the resulting shapes.


These Lupines were glorious - so happy in the cool Rocky Mountain air that they looked luminous.
So, back to work and the work is truly cut out for me now.  Realizing that it would take me months and months to figure out the vector tools in Adobe Illustrator CS5, I went online and started searching for local classes that I could attend.  And, I discovered a tutoring service, called WyzAnt.  There are tutors for Everthing - and they will usually come to your home.  The best part is, they are under $50.00 per hour, and you can get discount packages.

This afternoon, my new Adobe Illustrator CS5 tutor is coming to the studio to help me get my head around vector graphics instead of the raster images I'm so used to working with in Photoshop.  We'll see how far we get today.


Pansies Images Underway!


Rocky Mountain Sunset
I'll give you a full tutoring report tomorrow - if I can learn Adobe Illustrator CS5 in the comfort of my own home without breaking the bank, well - then - is this a marvelous world or what?

Sunday, July 10, 2011

Beach Cottage Bookbinding Studio

While we were waiting for Baby Blakely to arrive, I have been busy figuring out how to use all my new Bookbinding tools, and I think I finally have a good start on the process.  

The Beach Cottage studio is a mess, with Book Parts laying around everwhere:

These are some of the patterns I am going to make fabric out of...works for Books, too!


My first Book was okay, but not exactly even from front to back cover:

This Mango image is meant to be printed on Linen and framed under glass...time to get it done, now that I see it again.  It took me weeks and weeks to create this image - and I just forgot about it!

Living at the Beach, I'm partial to Coastal and underwater images...and my all-time favorites are images of Coral Branches and Sea Fans.  So I designed the following image over a year ago, and it was the first one I experimented with by having Spoonflower print it up for me:

Gluing up the Book Covers is agonizing.  Pure T.   But I am pleased with the finished look.

Once I finally got happy with the front and back Book Covers, I was off to the races, and started assembling:

Don't you think this would make beautiful fabric for a Lula Belle Handbag??  Or Wallpaper for a Beach Cottage accent wall??  Or how about Gift Wrap??  I started with the Coral image, then put it in repeat with other components to make the pages.  You can visit my post on making a Pattern Repeat to see how to do this.

The inside pages are lined and blank, meant for journaling or note jots:


And, here is the back cover:

All Done!


Next up, the Pomegranate Book - but that will be after I go see Baby Blakely again.


I think it's time to get the sewing machine cranked up and Sew "Stuff" to these Book Covers; and layer them up - what do you think?

Monday, July 4, 2011

How to Design a Half-Brick Repeat with Photoshop

Here is a quick tutorial to follow up on my post on how to create a Pattern Repeat.  You can use Photoshop (of course!) to do all the work for you after you've created your image.  Here's how.

Design an image - don't let the design go all the way to the edge of your canvas.  Make your image square.  Your image can be a print or painting that you scan into your computer, or something that you create using your computer.  Open it in Photoshop.  Then, to practice and get comfortable with this process, RESIZE your image to something that is fairly quick to handle - say, 500 pixels by 500 pixels at 72 DPI/PPI.  You can get serious later with higher resolution.


I've made this with a lot of Contrasting Colours so that you can see it better, even though the design doesn't make a lot of visual sense.   This image is 500 x 500 pixels.


Now, open a new blank canvas that is 500 x 500 pixels.  Then go to your image canvas, click on the Select Menu, and click "All".  

This selects your entire canvas quickly and accurately.


Go to Edit Menu, and click on Copy.  Move to your blank canvas, and click Edit, then Paste.


Now you have two identical screens, one with your original image, and one with the new canvas and your image layered on top.  

To begin your Half-Brick Repeat, you must double the width of your "New" canvas.  You do this by going from the Image Menu - select Resize, then Canvas Size.  You'll see a screen that shows you the current size of your image (500 x 500 pixels), and a section labeled "New Size".  In that section, make the WIDTH of the canvas exactly double, or 1000 pixels.  Keep the height the same as your original image.  Before you click OK, select the anchor on either the right or the left so that you get a full 500 pixels added to one side of your existing canvas, not 250 on each side.

See the Anchor arrows - this will make sure that the additional width is added to one side.
Now your canvas looks like this:


Duplicate this layer.  You can name it or not - I usually don't because I'm moving too fast!


To "drop" the image by 1/2, go to the Filter menu, choose Other, then "Offset". 


On the Offset Screen, enter the original width of your canvas in the Horizontal block, and half that value in the Vertical block.  This will drop your image by half.

 Now your image looks like this:

Flatten the layer after Offsetting it.
 Now you can fill in the blank areas with anything you want - just don't touch the edges!  Go back and look at How to Design A Pattern Repeat to see how Julia Rothman filled in her design. 

I filled mine in with Doodles and such, just to show you how to fill it out...


After you've filled in your design, be sure to flatten it if necessary, then Select All again, and move to the edit menu and select "Define Pattern From Selection".  Name the pattern the same name as your new file.

Open a new canvas at least twice as large as this pattern - 2000 x 2000 pixels.  This will allow you to see your repeat better.  Select -> All, then Edit-> Fill Selection, using your newly named pattern.  And this is what it looks like!


Now you can adjust your "additions" to make sure they are pleasing to the eye when filling a large expanse, and don't create an obvious line (like mine did up the middle).  Once you do this a couple of times, it will be so easy.  Now, get to designing!

Tuesday, June 28, 2011

How to Design a Pattern Repeat

When I first started designing images that I uploaded to Spoonflower for digital printing, I was centering the images for use on an 18" x 18" pillow.  The images had "White Space" all around them, because they were centered on the pillow, like a framed painting.  That left plenty of room for the seams, trims, and the zipper at the bottom of the pillow.  Then I started fiddling around with putting my images into repeats, with the idea that they could be used for wallpaper or gift wrap.

Spoonflower's in-house software can put your images into various repeats, like this Half Brick repeat shown on a Paul Stuart tie:


This is their Blue Printed Surfer tie.  See how the surfer shifts over on every other row?   That is a simple Half Brick repeat, and is pretty for small objects...or in small doses.  You wouldn't want several yards of 54" wide fabric printed like this, or the image would turn into a ditsy sea of dots.

To get an image to Flow across a large expanse, with no obvious start or finish, you have to use a few tricks.  


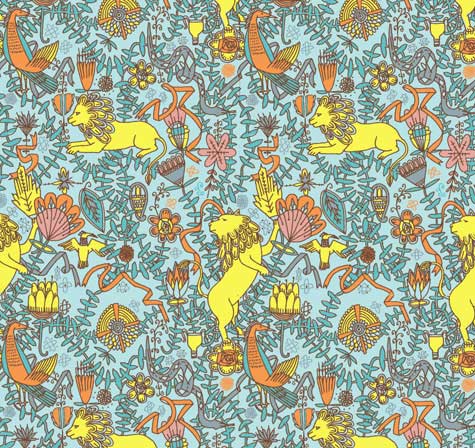
There is no defined center when you look at this Waverly fabric called Hidden Reef- it just flows seamlessly from side to side, and also from top to bottom.   Although it looks very complicated to create, it is actually quite simple.

After months of experimentation with Photoshop and their Offset Filter, I came across this straightforward tutorial in how to create a seamless repeat that flows effortlessly.  Julia Rothman shows us how she created this pattern:


Here is the text of Julia's tutorial:


"One of the questions I frequently get emailed is -how do you make a repeat pattern? I thought it would be fun today to do a little tutorial showing you how simple it is even with a very complex drawing. And you don’t even need a computer! (I usually do my repeats on the computer but today I’m doing it the way I was first taught.) Here’s the old fashioned way of making a tile-able design:


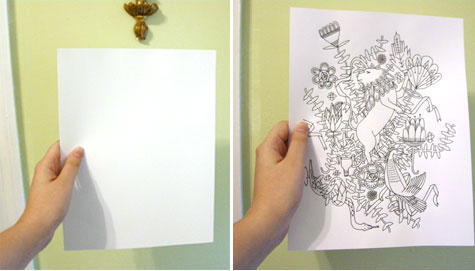
On a clean piece of paper draw a design in the middle of your paper without letting any of the drawing touch the edges- this is very important. (I am going to draw lions and vine-y things- an influence from last months visit to the American Folk Art museum in nyc.)


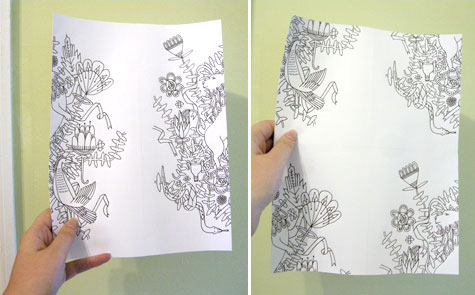
Once you finish the middle space as much as you want you are going to cut your drawing in half- scary I know- but that’s why computers are helpful. Once you have the two pieces flip them and tape your drawing back together. Put the tape on the back of the paper so it doesn’t obstruct your drawing at all later. Also try to tape your drawing back together as perfectly lined up as possible. It’s hard to see that I’ve even taped mine since I’ve lined it up so well. Next you are going to cut your drawing in half again the other way- (yikes!) and flip those pieces and tape them back together. Now your design should be on all the edges only and you have a big middle white space. Now fill this space with the rest of your design. Remember again- do not draw to any of the edges of the paper.

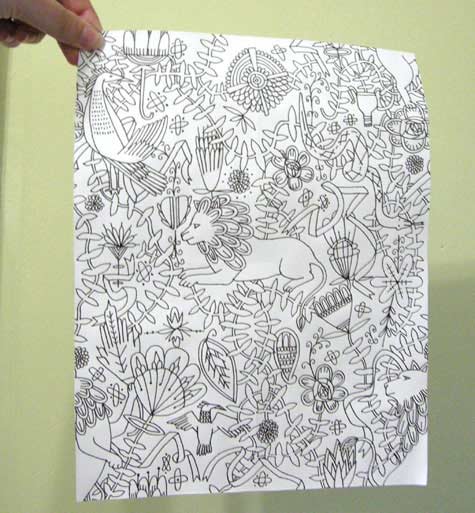
Once you finish filling in all the parts you want to fill in you now have your repeatable tile. You could color this tile and then xerox it many times and line up your design- plaster it on your walls and make wallpaper. I am going to cheat and do the final coloring steps in the computer to finish up my design. I am going to scan my drawing, take it into Adobe Illustrator, color and repeat it there."


I used Julia's tutorial to go to Photoshop and use the Offset Filter to whack my design into quarters, like she did, and then just filled in the center with the whole (original) design.  You could always put something different in there...the sky is the limit!

Now to figure out a half-drop, tileable repeat...any suggestions out there??

Monday, June 27, 2011

Beach Cottage Renovation Finished!

After my two month hiatus to tend to the Beach Cottage renovation, I have GOT to get back to Textile and Graphic Design.  So that I don't feel like I left everyone in the middle of the road, here are some shots of our finished renovation - that I am just so in love with.  Pictures aren't hung yet, because I can't bear to put holes in the walls yet!  Maybe tomorrow.

The "sewing/create something" room is now totally white.  I took the old kitchen peninsula and made a cutting/pattern table out of it.  And, look at my new window by the sewing machine!
This is what it looked like before:


Big Change, there!

Kitchen all finished!
My yummy new tub, that USED to be my closet!
The mirrors tilt!
Wooden blinds coming tomorrow - do you remember how this looked a month ago?  Yikes!
This was the bathroom on May 24.  What a difference, huh?

     So much work, soooo much work.  But I am happy, happy, happy.  And now it is time to get back to Surface Design...graphics, textiles, Illustrator and Photoshop.  In my clean new house!


LinkWithin

Related Posts Plugin for WordPress, Blogger...