Showing posts with label Beach Cottage. Show all posts

Tuesday, August 23, 2011

Hurricane Irene Gets Our Attention

In the past six years or so, those of us with Beach Cottages located on the Southeastern Coast of North Carolina have gotten a little complacent.  We haven't been hit by a hurricane in years.  Hurricane Irene, however, has gotten our attention.


When you live on the Southeastern Coast, in August and September every year you develop a heightened awareness of  pools of disturbed weather that swarm off the West Coast of Africa and head West.

Sometimes they solidify into Tropical Storms and cross over the Windward Islands, the Dominican Republic and maybe Cuba - with The Weather Channel in hard, constant pursuit - reporting every waggle in full color.

Jim Cantore and all the team at The Weather Channel become a part of your family and set up camp in your living room.

NOAA's National Hurricane Center is bookmarked on your toolbar.  Hours, sometimes days, are spent in front of the TV trying to determine whether you are in the Cone of Certainty.

Erika Santelices/AFP/Getty Images

 For a number of years now, somewhere around Day 3 the storm takes a hard right and loops back out into the Atlantic.  This time, it doesn't look like that is going to happen:


As of right now, we are Dead Center in the Cone of Certainty.
Now Hurricane Irene Has Our Attention.

And we just Renovated the Beach Cottage.

I'm going to check on Jim and the team...I don't think they've had breakfast yet.  And I have to stock in groceries and beer...and lots of wine.  There's a check list around here somewhere...

Sunday, July 10, 2011

Beach Cottage Bookbinding Studio

While we were waiting for Baby Blakely to arrive, I have been busy figuring out how to use all my new Bookbinding tools, and I think I finally have a good start on the process.  

The Beach Cottage studio is a mess, with Book Parts laying around everwhere:

These are some of the patterns I am going to make fabric out of...works for Books, too!


My first Book was okay, but not exactly even from front to back cover:

This Mango image is meant to be printed on Linen and framed under glass...time to get it done, now that I see it again.  It took me weeks and weeks to create this image - and I just forgot about it!

Living at the Beach, I'm partial to Coastal and underwater images...and my all-time favorites are images of Coral Branches and Sea Fans.  So I designed the following image over a year ago, and it was the first one I experimented with by having Spoonflower print it up for me:

Gluing up the Book Covers is agonizing.  Pure T.   But I am pleased with the finished look.

Once I finally got happy with the front and back Book Covers, I was off to the races, and started assembling:

Don't you think this would make beautiful fabric for a Lula Belle Handbag??  Or Wallpaper for a Beach Cottage accent wall??  Or how about Gift Wrap??  I started with the Coral image, then put it in repeat with other components to make the pages.  You can visit my post on making a Pattern Repeat to see how to do this.

The inside pages are lined and blank, meant for journaling or note jots:


And, here is the back cover:

All Done!


Next up, the Pomegranate Book - but that will be after I go see Baby Blakely again.


I think it's time to get the sewing machine cranked up and Sew "Stuff" to these Book Covers; and layer them up - what do you think?

Our Miraculous New Baby Girl

After nine long months, our newest beautiful Grandchild was born just before 6:00 AM yesterday.  Baby Girl Blakely has been happily snoozing away in her Mom's tummy for weeks on end, and we thought she would never come out to meet us.  

With only a little prodding from the doctor, she decided to wake up and join the rest of the world a little faster than anyone expected after that long wait - so there was some pandemonium in the hospital halls as everyone raced to catch her before she jumped out on her own.

She was alert and ready to go, since her Mom never got any drugs to help her with the labor and delivery, and looked everyone straight in the eye to put us on notice that she intends to make her mark in this family right quick.

So with a little help from me, here is her first Blog:


Hello everyone out there...my name is Blakely.  I am pretty new at this, but I know I'll catch on quick.  First of all, I want you to meet my beautiful Mommy:

Don't you think she looks like me?
She thinks I may wind up being a Volleyball star, but we'll see...Dad is all for anything I do, but he's already told me that he's going to teach me how to fish so that I'll be Lady Angler of the Year in about 18 years.

This is my Grandpa and my cousin Caroline...she is so smart, so beautiful - and she's going to teach me how to do all the stuff she knows how to do. I can tell that she likes me already...and my Grandpa has already told me I can have anything I want - anything!

I think I'll ask for a new Jaguar and a cell phone.

I got pretty hungry while all the adults were taking pictures and talking about me and my snappy little entrance, so my Mimi helped me out a little bit...

She's my Mommy's Mom, so she already knows how to do this stuff.

This is my first day, and I've been through a lot.  I'm getting sleepy now.


So, I think I will take a little nap...I've got the rest of my life to tell you more about me, so there's no hurry right this minute... 

G'night, all.


Friday, July 8, 2011

Orange Accents At the Beach!

I've been in an Orange Mood lately, and I just had to share these photos with you - they have really jazzed me up for the weekend stint in the Studio! 

Just look at this palette!  It is pure genius.
 Lauren Guarcello, of Porter Design Company, did this room for the Stately Homes by the Sea Showhouse.  Here's another look:

For some, the walls may seem too dark...but look -  the white bedding just lifts it right up.
 These gorgeous photos are courtesy of Peter Rymwid, and were posted by Kerri, a talented artist at Driftwood interiors in Brisbane, Australia.  She was tapped to create these paintings to co-ordinate with the room:

Now, doesn't this just make you want to go Crisp Up a room by throwing some Orange in it?
Look out, bedroom...you thought you had escaped!

Monday, June 27, 2011

Beach Cottage Renovation Finished!

After my two month hiatus to tend to the Beach Cottage renovation, I have GOT to get back to Textile and Graphic Design.  So that I don't feel like I left everyone in the middle of the road, here are some shots of our finished renovation - that I am just so in love with.  Pictures aren't hung yet, because I can't bear to put holes in the walls yet!  Maybe tomorrow.

The "sewing/create something" room is now totally white.  I took the old kitchen peninsula and made a cutting/pattern table out of it.  And, look at my new window by the sewing machine!
This is what it looked like before:


Big Change, there!

Kitchen all finished!
My yummy new tub, that USED to be my closet!
The mirrors tilt!
Wooden blinds coming tomorrow - do you remember how this looked a month ago?  Yikes!
This was the bathroom on May 24.  What a difference, huh?

     So much work, soooo much work.  But I am happy, happy, happy.  And now it is time to get back to Surface Design...graphics, textiles, Illustrator and Photoshop.  In my clean new house!


Thursday, June 23, 2011

Beach Cottage Mahi Bowl Meal

The Beach Cottage renovation is virtually finished, and now all I have to do is find everything I packed away and try to integrate the old with the new.  Not to mention figuring out how to get used to operating the new equipment. 

We've never had gas cooking out here on the island, so after 28 years of preparing meals on an electric stove, here we go!  As promised, here is a recipe and photos of the yummy Mahi-Mahi that was presented to me by the Captain, and cooked up on my new gas range:


We actually call Mahi-Mahi by the East Coast name of Dolphin...in the Keys, they call it Dorado sometimes.  This is what the fish looks like, so that you don't confuse it with the Dolphin mammal, aka "Flipper"!


This is my oldest son with a big Bull Dolphin, aka Mahi, caught on an Ocean Isle Fishing Center boat.
Mahi recipes are all over the map, as it is a very sweet tasting fish which people love, and it also freezes beautifully.  We always freeze the filets or chunks in quart Zip-Loc bags, with the fish surrounded by water.  When I thawed out the fish for our Mahi Fish Bowl, I simply put the bag in fairly warm water until the fish/ice block could be removed from the bag.  Then I let the block sit in lukewarm water until the pieces could be pried apart without breaking.  Once they were pliable, I cut them into strips or chunks about 2 x 3 inches each.  


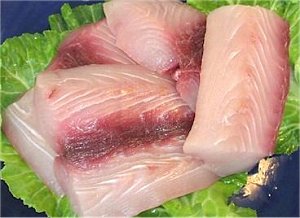
Mahi takes awhile to cook through, so it is easier to get a consistent texture if you cut it up into small pieces.  Like this:
This photo, used on several sites, shows the dark red bloodline - I ALWAYS remove the bloodline.

When we want to just chill out in front of the TV and watch Deadliest Catch, we've found that the best way to eat is simply out of a Bowl.  That is, everything piled into one bowl, so you can curl up in your favorite spot and not be spilling something off a flat plate when the Time Bandit takes a rogue wave.  


Keep it simple - a couple of main ingredients, with condiments or accents piled on the side, and all presented on top of steamed rice is about all you'll need, other than soy sauce and, for me - always - Rooster Sauce!  I can't eat without it.
This stuff is HOT.  It's made by a company named Huy Fong, out of California.  How it started is quite a story, and you can read about it Here.  The image came from their website, Huy Fong Foods.


But, back to the recipe.  Here are the ingredients for the Asian Flour:
     Self-Rising Flour - about a cup or so.  Sometimes I cut it with some cornstarch
     Sea Salt - you can sprinkle this on the fish, but I  just put it in the flour-not too much!
     Garlic Powder - to your taste, but not too much or it will overpower the Mahi
     Ginger Powder - about a teaspoon
     Black or Regular Roasted Sesame seeds - about a quarter cup
     Assi Brand Coarse Pepper Powder - a heaping tablespoon, at the minimum
You can get this at any Asian market - I use it in a lot of my cooking...including Pinto Beans!
For the oil, I use 2/3 Peanut Oil, 1/3 Olive Oil.  Just get it hot, dredge your Mahi in the flour, and slip it in.  Turn once after the first side has turned golden.  You know it's done when a fork inserted in the fish will turn easily...don't overcook, but be sure it is done through.  Some fish is good on the medium rare side, but not Mahi.

Here is my new range, going full blast on our Mahi Bowl Meal:


Meanwhile, just oven-blast some fresh broccoli:


Thaw out some frozen Tobiko (the roe of Flying Fish-available at Asian Markets) if you like, 
and re-hydrate some Seaweed or buy Seaweed Salad at your local Asian Market.  Scoop out some fresh steamed rice, put it in the bowl and top with your Mahi and other condiments.  


Turn on Deadliest Catch, pour the wine, grab your chopsticks and go!

Monday, June 13, 2011

Beach Cottage Decor - Shopping List

It's time to resume "Normal Life" and the Beach Cottage Renovation.  When I walk back in there tomorrow night, the floors should be refinished and gorgeous, and we'll be ready to place the furniture back where it belongs and start unpacking boxes.  Meantime, I've been thinking about how to accessorize our new updated look, and find myself falling for looks like this:

I love the idea of using these glasses for wine - I found them at Berry Red.

 Also love the look of this sideboard - and you just KNOW that I will be making the Giant Clamshell myself...


The Guest Bathrooms will need new shower curtains, and they'll also need new hooks - these are perfect for the look I'm going for:

I also found these at Berry Red - my newest online fave store to browse.  Don't you love the retro look of these?

I can hardly wait to haul my big belt sander up from the basement and sand the top of my dining room table down to the wood.

Okay, so you can't really see the table, but it is painted white.
And, because we cook so much with fresh produce from local farmers, I need one of these:


I'm so happy with the palette I've chosen, and can hardly wait to start integrating my old accessories in with the new - not to mention firing up my new gas stove and grill!

The King Mackerel, Sea Bass, Mahi-Mahi, and Spanish Mackerel are biting off the coast right now, and I WILL be sending Husband off to fish...recipes to follow!

Sunday, June 5, 2011

Cabinet Hinges in a Nutshell...

As promised, here's a quick jot on Cabinet Hinges - not very entertaining, but if you are renovating your kitchen, you are going to run into this.  Took me DAYS to work all this out.

If you are trying to keep your existing cabinets (as I was) you need to know the different styles of cabinet before you go off shopping for hinges.  Here are the two different styles:

You can see that the cabinet on the bottom takes a hard right and hard left when it comes to the front.  The door has to be mounted onto this frame,  determines what choices you have on your hinges.

My cabinets are "Face Frame Cabinets":

My doors sit on top of the Face Frame - they don't go out to the edge, and they aren't centered inside the opening.  They OVERLAY the frame.


So now I knew what kind of hinge configuration I needed...an overlay hingeOnly an overlay hinge will work in this configuration - not a full or partial inset hinge.  That narrowed the choices considerably.   I wanted little or no hinge visible, and the cabinet maker and job foreman firmly suggested that I go with a European hinge rather than a partial overlay hinge.  The reason?  The good ones are adjustable 3 different ways.  That means you can always go back and loosen the set screws and adjust them if your house settles and the cabinet doors start looking like they aren't on straight!  

So, I used a 5/8" European overlay hinge in brushed nickel.  And, many of the decisions were made for me before I even went shopping...  You can buy these in "Contractor Packs" of 10 at The Home Depot.  Comes out better on the budget that way.

The hinge will be invisible from the outside, allowing my hardware to be the stars of the show!
The reason I had to go with the 5/8" was because my oak frames are what carpenters call "one-by".  That means the frame is 1" by 2".  Only it isn't totally 1" thick - for some reason in this industry, if it says it is 1" thick, it is only 5/8".  That is a mystery I am not willing to spend time on to figure out.

Now, my fairly simple hardware will be the only metal showing on my doors:


Cup pulls for the drawers.
 Okay, I know how boring that was, but trust me, this is info you can use if you are updating your kitchen any time soon.  You won't spend days and days picking out your hinges, and have to return them all because they won't work!

Wednesday, June 1, 2011

Secrets Of A Successful Coastal Cottage Renovation

Today I was at Home Depot and Lowe's, picking up more materials for the Beach Cottage Renovation, and was thinking about how much I have learned.  There aren't any books out there to tell you the little Secrets to Coastal Cottage Renovation.  I was thinking that I should write a pamphlet, but decided my blog would work, too.  So, here goes.


Rule No. 1:  ALWAYS use a reputable general contractor for Coastal Renovations, one that you know personally if at all possible.  Like this one at Ocean Isle Beach: http://wbpropertiesofnc.com


Examples of work by WB Properties


Coastal communities draw all sorts of folks who have the bright idea to "live at the beach and do some work on the side to support myself".  The work comes 2nd.  The beach comes firstAlways.   Getting Sub-Contractors to finish the job on schedule is almost impossible if the fish are biting or the surf is up.  Know what I mean? You need a General Contractor who is mean as a snake to get those guys back off the water and on the job.

Rule No. 2:  KNOW the language and vocabulary of your coastal home and lifestyle.  This way, the millions of choices out there will shrink to a handful, and you will always know you are "in the zone" when choosing paint, hardware, and architectural details.  Be authentic to your vocabulary, and you can't go wrong.

You just know from the exterior of this Coastal home what the interior is like - it has to be Tuscan in flavor.


The color of the exterior, the tile, and the architecture all say that the interior should be Tuscan in vocabulary - that means earthy rusty oranges, olive greens, reds, and yellow tones, with oil-rubbed bronze, natural wood, and a huge stone tiled kitchen area that opens out to an expansive patio with an outdoor kitchen.


See the earthy greens, oranges, and golds?


This Mission/Prairie style Coastal home says that you will NOT  find hot  pink, lime green, and flamingoes in the bathroom:

This is the Coastal Living Idea House for 2009.
 Instead, you will find granite counter tops with black flecks, oil-rubbed bronze hardware, white kitchen cabinets, and lots of built-in shelving and ceiling work.   Pretty much Prairie-Style, but with creamy whites lifting it up to a Coastal Look.

Looks like this:


Or this:


And then, there's the Coastal Style that is best portrayed at this blogspot that I found about a month ago - Lime in the Coconut


This photo just says it all - very saturated color, ethnic influences in the decor, and an easy/breezy lifestyle with the focus on Mediterranean/Florida Keys flavor.
The back of the house probably has a patio/deck that looks like this:


See what I'm talking about?  You INSTANTLY know what belongs in these homes, and all the other bazillion choices just drop by the wayside.  That's the vocabulary that you choose, and you just take it and run with it.  Easy, yes?


Next post:  The nuts and bolts of ceramic tile and cabinet hinges.

LinkWithin

Related Posts Plugin for WordPress, Blogger...